
Have you ever wondered how some people’s gardens start off much faster than yours? I know every spring I drive by looking at gardens and it seems like one moment there’s nothing in the ground. Then, all of a sudden, there are 3-foot tomato plants. How does that happen? At first, I thought it was the type of soil or fertilizer they used. Then, one day, I was driving by and saw an old man with a large black drawer (at least that is what it looked like). He began picking up small pods and putting them straight in the ground…EUREKA! Seed starting! That’s how they do it. And now, that’s how we do it.
I think in general we tend to over think seed starting. Starting a plant by seed in its basic form is actually rather simple. We tend to over complicate it by saying that the soil needs to have this much nitrogen and that much phosphorus. However, at the end of the day for a seed to germinate it really only needs three basic things: loamy soil, water, and light.
If it’s really that simple, why are there so many videos and information out there about this subject? Easy. Everyone has their own twist on the three basic materials needed to start seeds.
So, before we explore those twists, let’s talk about what to start your seeds in. Surprisingly, you can start seeds in just about anything. All of the big box stores sell different things boasting, “Best thing out there when it comes to starting seeds.” When in fact all you really need is some type of container to hold your soil and seed. Which means that you can use anything from a solo cup to those nifty little jiffy pods as long as it will hold the soil and provide drainage.
So now that you know what to plant in, let’s explore the three components a little more.
LIGHTING FOR SEED STARTING

Some people will talk about color temperature and the range that provides the “best” conditions for seed germination. But I am not going to bore/confuse you with that information. In my experience, I have not seen a significant difference when you are just trying to raise our own food.
We have used all different kinds of light over our seeds and we still have had seeds germinate. When we first began seed starting, we used fluorescent workshop lights. They worked great, but the bulbs did not last long, mostly from breakage. If you plan on keeping your seed starting area in one designated place and never moving it, this is a good option. But as technology grew, so did our garden and our seed starting area for that matter.
On one of our trips to Home Depot to replace fluorescent bulbs, we came across LED shop lights. Since they last much longer and are more energy efficient, we figured we would give it a go. We were pleasantly surprised that they work GREAT! We have had people tell us that plants won’t germinate under LEDS because they are not the right light temperature but I am here to tell you that we have seen great germination rates with these lights. Nothing fancy, just the lights from the local Home Depot. They are about three feet long which is perfect for our shelving system. As long as you have some type of light on them you should see germination. The only real important thing I would say when it comes to light is that you want to have your light as close to the soil as you can. Once you have reached germination, raise the light till just above the top of the plant to avoid them growing leggy. Enough about light, time to get in the DIRT.
For a more in depth discussion on light click here.

SOIL FOR SEED STARTING
Now this subject can get a little controversial. There are so many different opinions about what the soil needs to not only help with germination but to ensure you have a strong and healthy plant from the beginning. Think of your seedling as new born baby. Breast milk is the best for a baby because it has everything needed to get a solid foundation for a healthy life. The soil is the breast milk for your plants. You want your seedling to have everything it needs from the very beginning so that it can grow up to be a strong healthy plant.
The soil’s job is to provide four main things: Anchorage, water, oxygen and NUTRITENTS! Anchorage means the soil gives the plants support, something to anchor to as it reaches towards the sunlight. As for water, the roots of your plant will receive anywhere from 200 to 1000 pounds of the water the plants needed for photosynthesis stored in the soil. The roots are the BEST water absorbing tool the plants have.
Now when it comes to oxygen, I know some of you might be screaming at the screen right now saying plants release oxygen into the air. You are partly right. Plants need a small amount of O2 to survive. Most of the o2 that they use is in the roots. So, between the roots of plants and microorganisms, “soil air” is mostly Co2. This is the purpose of aerating your pasture or lawn from time to time. It allows more O2 into the soil and ultimately the roots of your plants.
Finally, the soil provides nutrients, the plants food. This is what makes or breaks your plant. Each plant has different needs distributed through the root system of that plant. When you water or it rains, the roots absorb the nutrients that are in the soil. The water creates a soil smoothie and the different nutrients that are in the soil (Nitrogen, phosphorus, Potassium) can be absorbed through the roots. This is the main reason why systems like hydroponics and aquaponics work. The only other thing needed is some type of a core system for the plants.
So, with all of that being said as long as you are using a loamy soil that has plenty of nutrients in it your plants will have what they need for a great start in their life.
For more in depth information on soil click here.

MOISTURE FOR SEED STARTING
Now that we have talked about the importance of soil let’s move into the final ingredient, water or moisture. Why do I say moisture? Well that is simple. We did a homeschool science project once where we used different things to see if they would germinate the seeds. We used water, coke, tea, and coffee. Surprisingly, we had germination in all, with Coke having the best germination rate. I believe that Coke has properties to help break down the outer shell of most seeds which speeds up the germination process.
So, there is really only one rule that you need to follow: don’t over water. Make sure that the container that you are using has good drainage. You want the soil to stay moist not wet. But you also don’t want it dry. So how can you keep your soil moist? Well if you have the space and the means, you can set up a micro irrigation system and set up misters to run on a timer every 30 min or so. That way the soil remains moist. Keep in mind, that whichever grow lights you use, your soil will dry out.
So, the misters are one of your best options. A more cost-effective way is to water from the bottom. Simply put your seed starting container inside a larger container that will hold water. That way when the soil starts to dry out it can draw the water up from the bottom. Of course, you could continually check the soil, but who has time for that?
Once you have germination, you may want to increase the time your misters go off go from every 30 to every 15 minutes. Then just monitor your containers don’t let the soil get wet and sit back and watch your plants grow.
One other thing to note. If you use a seed starting container that has a clear plastic top, make sure to monitor the moisture. The top is meant to keep the “heat” generated from the light and the soil inside the container to aid in the growth of the plant. In theory this is a great idea, but once the seedlings start to grow, the moist heat can cause problems like mold and fungi. In my experience, it is more effective to control the temperature of the area where you are seed starting. We use the tops in the very beginning, but once the seedlings break ground, we remove the tops.
For more information, check out our video on seed starting.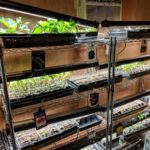
If you follow these simple suggestions when starting your owns seeds, you will be on your way to having great success with your garden. Happy Gardening!!!